Prerequisites
- SQL Server 2019: Ensure it's installed and configured.
- SSMS: Install with server authentication enabled (using sa).
- Database Import: Import the database into SQL Server.
- Crystal Reports: Use the specified version compatible with the setup.
- Report Viewer: Install the required version and the supporting files if version conflicts occur.
1. Prepare the Files
- Create Folder : Create a folder named HRMex.
- Upload Project Files : Upload the project files into the HRMex folder.
- Update Connection String : Modify the connection string as needed for your environment.
2. Install IIS
Open Control Panel:
- Go to Control Panel > Programs and Features.
Turn Windows Features On or Off:
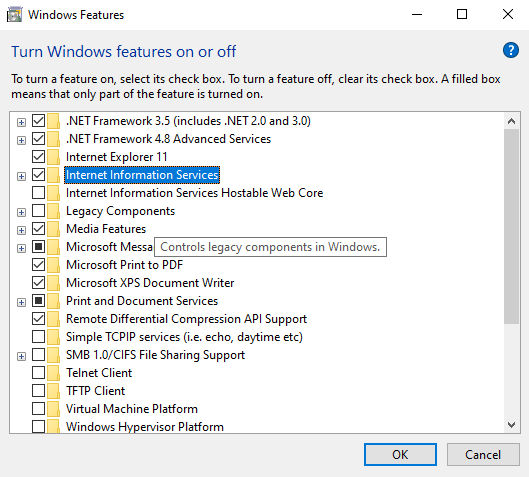
- Click on Turn Windows features on or off on the left side.
- Check .NET Framework (both 3.5 and 4.8 advance series) and Internet Information Services (IIS) (make sure there are check marks next to them).
- Click OK and allow Windows to download and install the necessary files.
3. Create and Configure the IIS Site
Open IIS Manager:
- Open IIS Manager from the Start menu or by typing inetmgr in the Run dialog.
Create a New Site:
- In the Connections pane, expand the server node.
- Right-click on Sites and select Add Site.
- Site name: Enter HRMex.
- Physical path: Click the ... button and select the location of the HRMex folder.
- Port: Change the port from the default to a specific port (e.g., 90).
- Click OK.
4. Configure Site Settings
Set Default Document:
- Click on the newly created site.
- Go to Default Document in the middle pane.
- Find default.aspx and use the Move Up button to move it to the top of the list.
Configure Application Pool:
- Go to Application Pools in the left pane.
- Click on the application pool for your site.
- Click Advanced Settings in the right pane.
- Set Enable 32-Bit Applications to True.
Configure Authentication:
- Click on the server name in the left pane.
- Go to Authentication in the middle pane.
- Enable all authentication methods except Digest Authentication.
5. Go Live
- After completing the above steps, your site should be ready to go live!